How to check CPU temperature on Ubuntu Linux
How do I check CPU temperature in Ubuntu Linux using a command line and GUI tools on my Thinkpad laptop or Desktop computer?
One of the most common complaints is the overheating laptop, especially older models. Laptop components are tightly put together to each other. So there is very little room for air movement in thinner laptops. If your laptop overheats, it can cause some damage to your body as well as the hardware parts. Therefore monitoring hardware temperature is essential. In this tutorial, you will learn how to check CPU temperature in Ubuntu Linux.
| Tutorial details | |
|---|---|
| Difficulty level | Easy |
| Root privileges | Yes |
| Requirements | Linux terminal |
| OS compatibility | Debian • Mint • Pop!_OS • Ubuntu |
| Est. reading time | 4 minutes |
Advertisement
Procedure for monitoring CPU and HDD temperatures on Ubuntu
- Open the terminal application.
- Install the lm-sensors and hddtemp packages in Ubuntu using the following command:
sudo apt install hddtemp lm-sensors - Run hddtemp command to see SSD and hard drive temperature in Ubuntu.
- Execute sensors command to find out CPU temperature in Ubuntu Linux.
Let us view processor temperature including SSD/HDD in details for Ubuntu desktop or server with configurations.
Check CPU temperature in Ubuntu Linux
The sensors command is used in Linux to show the current readings of all sensor chips including CPU temp. The hddtemp command will show you the temperature for SSD and HDD. You need to install and configure the lm-sensors package as well as hddtemp. You can search it using the following syntax:
apt-cache search lm-sensors
apt-cache search hddtemp
To install these packages on Ubuntu, run the following apt command or apt-get command in a terminal:
sudo apt update
sudo apt upgrade
Install lm-sensors in Ubuntu Linux
Type the following apt command:
sudo apt install lm-sensors
Next you need to detect hardware monitoring chips installed in your laptop. Hence, start the detection of your laptop hardware sensors that will provide information about:
- Sensors embedded in CPUs and other super I/O chips
- Hardware monitoring chips accessed through I/O ports and SMBus/I2C bus on your system
Type the following command:
sudo sensors-detect
Display CPU temperature in the command line
Execute the following command:
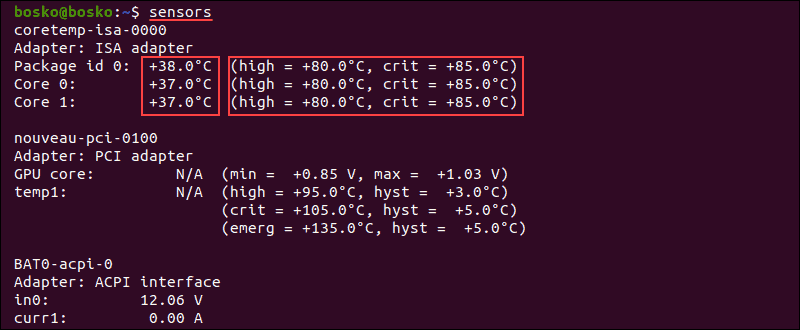
sensors
One can use the watch command command to run sensors command repeatedly, displaying its output on screen:
watch sensors
How can I show the CPU temperature in the GNOME panel
Install Freon and Sensors extension for Ubuntu Linux desktop:
How to install hddtemp in Ubuntu Linux
Run the following apt command:
sudo apt install hddtemp
How to see hard disk temperature in Ubuntu
Simply type:
hddtemp
sudo hddtemp SATA:/dev/sda
Sample outputs:
/dev/sda: Samsung SSD 850 EVO 500G: 32°C
Use disks & storage GUI tool to view hard disk temp
Hard disks have a built-in health-check tool called SMART (Self-Monitoring, Analysis, and Reporting Technology), which continually checks the disk for potential problems. SMART also warns you if the disk is about to fail, helping you avoid loss of important data. It also displays hard disk temperature. Run:
gnome-disks
How to monitor Nvme ssd temperature in Ubuntu
First install nvme-cli, run:
sudo apt install nvme-cli
Now use the nvme command as follows to get list of all NVMe devices and namespaces on machine:
sudo nvme list
Sample outputs:
Node             SN                   Model                                    Namespace Usage                      Format           FW Rev
---------------- -------------------- ---------------------------------------- --------- -------------------------- ---------------- --------
/dev/nvme0n1     S3EUNX0JXXXXXXH      Samsung SSD 960 EVO 500GB                1          36.53  GB / 500.11  GB    512   B +  0 B   2B7QCXE7
sudo nvme smart-log /dev/nvme0
One can filter output using the grep command:
sudo nvme smart-log /dev/nvme0 | grep temperature
temperature : 40 C
Introduction
Like any electrical component, CPUs generate heat when being used. Some resource-demanding programs cause the CPU to increase the clock speed, which results in higher temperatures. Dust buildup also causes the CPU to overheat.
High temperatures shorten the lifespan of sensitive components, so keeping track of CPU temperatures is crucial. This way, you prevent performance throttling or component damage.
In this tutorial, you will learn how to use different tools and in-built utilities to check CPU temperature on Linux machines.

Prerequisites
- A machine running Linux
- An account with sudo/root privileges
Check CPU Temperature Using Lm-Sensors
Lm-sensors is a command-line utility for hardware monitoring. Use the tool to check the temperature of the CPU and other components. Follow these steps to install and configure Lm-sensors:
1. Open the terminal and install these packages using a package manager for your distribution. In Ubuntu, use the following command:
sudo apt install hddtemp lm-sensors
Wait for the lm-sensors and hddtemp to finish downloading and installing.
2. Execute the sensors command to see the CPU temperature. The output shows the current temperature readings of all sensors in the machine. The results include the temperature of each core and maximum thresholds.
3. To check SSD and hard drive temperatures, execute the following command:
sudo hddtemp /dev/sda

The output shows the temperature of the selected disk.
4. To see which system components you can monitor, run sudo sensors-detect.
Answer YES to multiple scanning requests until the system scan is complete.
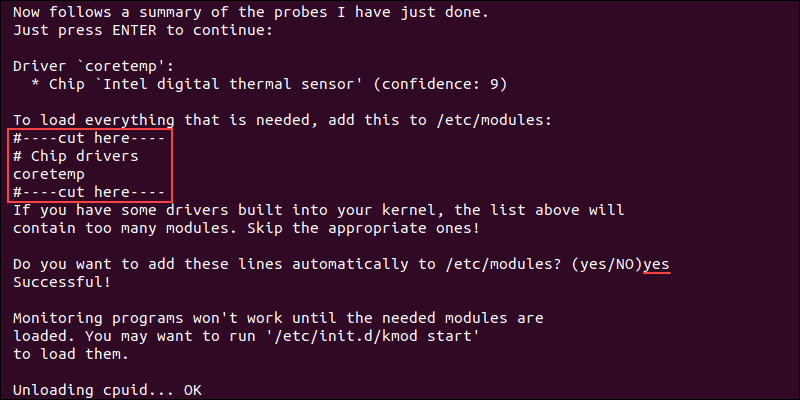
When the scan completes, the output shows the summary.
5. To ensure that system monitoring works, load the needed modules using the following command:
/etc/init.d/kmod start

6. To run the sensors command repeatedly and get real-time data in the terminal, execute the following command:
watch sensors
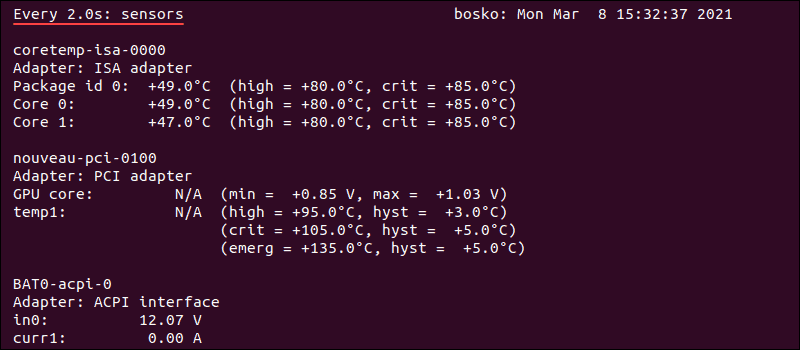
The output refreshes every two seconds and displays the current CPU temperature reading.
Note: To check CPU usage on Linux, read our tutorial on How to check CPU usage.
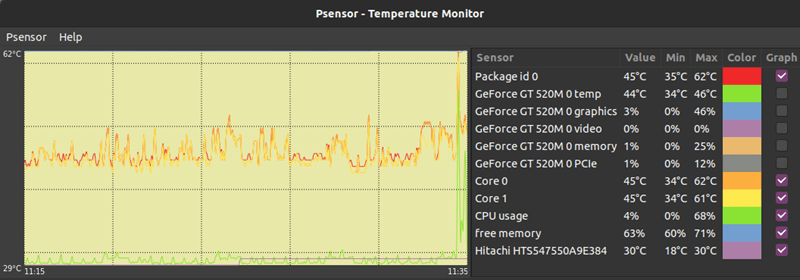
Check CPU Temperature Using Psensor
Psensor is a GUI app that allows you to monitor the temperature of various system components. This utility also allows you to monitor CPU usage and fan speed.
Psensor includes an applet indicator for Ubuntu, allowing you to display the temperature in the top panel to notify you when the temperatures get too high.
Install Psensor
Before installing Psensor, you need to install and configure Lm-sensors.
1. Run this command to install the necessary packages:
sudo apt install lm-sensors hddtemp
2. Next, scan for sensors in your machine:
sudo sensors-detect
Answer YES to any scan requests until the scan is completed.
3. To make sure the packages are installed, execute the sensors command.
4. Update the package repository with sudo apt update.
5. Install Psensor using the following command:
sudo apt install psensor
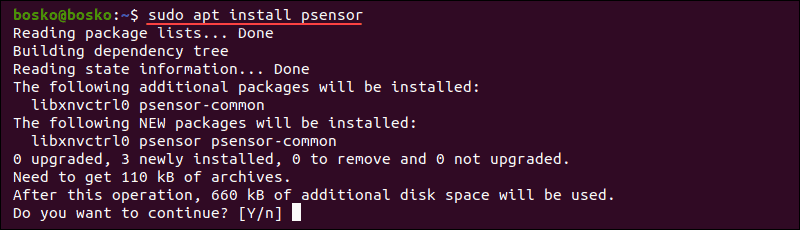
Answer YES and wait for the installation to finish.
Using Psensor
Search for Psensor in the app menu and open the utility. The app displays a graph of the selected values and shows the CPU temperature, CPU and memory usage, free RAM, GPU temperature, and HDD temperature.
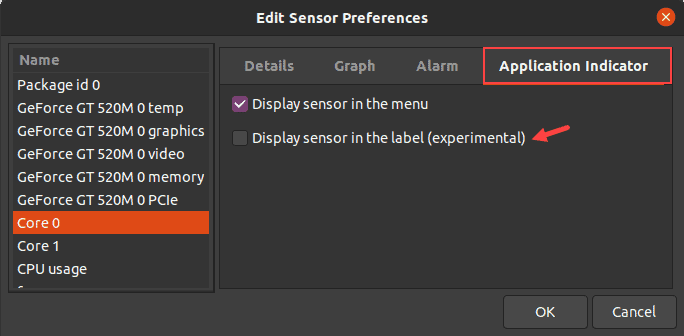
To configure Psensor and set which stats you want to see, follow these steps:
1. Click Psensor in the menu bar, followed by Preferences.
2. Check off the boxes for the options you want – whether Psensor launches on system startup, the update interval, graph colors, etc.

3. To show CPU or HDD temperatures in the top panel, go to Sensor Preferences under the Application Indicator. Enable the Display sensor in the label option.
Check Temperature Without Third-Party Utilities
There is a way to use the in-built utilities to check the CPU temperature if you don’t want to use third-party apps.
1. To check the CPU temperature without installing a third-party app, use the following command:
cat /sys/class/thermal/thermal_zone*/temp

The output shows the CPU temperature in the five-digit format. Here, 49000 means 49C.
2. If you get several thermal zones and different temperatures, execute the following command to see what a single thermal zone represents:
cat /sys/class/thermal/<thermal_zoneNumber>/type
For example, run cat /sys/class/thermal/thermal_zone2/type to see the type of thermal zone 2.
The CPU temperature is in the zone labeled x86_pkg_temp.
3. To see what all the thermal zones are referring to, use:
paste <(cat /sys/class/thermal/thermal_zone*/type) <(cat /sys/class/thermal/thermal_zone*/temp) | column -s $'\t' -t | sed 's/\(.\)..$/.\1°C/'

The output shows the last stored temperature for that thermal zone in degrees Celsius. In this example, there is only one thermal zone, labeled x86_pkg_temp, which represents the CPU temperature.
Conclusion
You now know how to check CPU temperature on Linux using various utilities. The guide also showed how to configure the tools to display other information, such as GPU and HDD temperature.